Pages

Wednesday, 20 May 2020

Kaleidoscope

One of my go to methods of creating pattern is inspired by the way a kaleidoscope works. The idea is similar to the way you can cut a snowflake from folded paper, you could cut shapes out or find other ways to work with drawn marks.


The size, and shape of the original sheet of paper will influence this pattern as well as how you fold it up.


I have a tool called a tracing wheel which is used in dressmaking, but I love to draw with it. By going over a simple pencil outline on one face of the folded paper the outlines are transferred to the hidden faces of the paper.


Areas can be blocked out so they are positive or negative shapes, areas could be cut out also.

If you don't have a tracing wheel maybe you could find tracing paper or some light weight paper which will show the original drawn outline, trough to other folded paper surfaces.


This is an example photographed in my studio (no room at home for larger work!) I use the technique to make patterns from leaf shadows


Lastly a link to instructions for making a kaleidoscope.


Researching for this post I came across a suggestion about not only putting beads etc in the end but also using the tube to look at anything - flowers, leaves, clouds. A nice reminder that anything you come across has a few hidden depths or aspects that you haven't thought of before.

Monday, 18 May 2020

Growing slowly

Be not afraid of growing slowly, be afraid only of standing still.
Chinese proverb


Sewing seeds is something that should be quite zen, personally I am still working on this. Nothing seems to be in the right place and I'm never sure I am doing the right thing. This is my fourth year of allotment-ing, or maybe my fifth but I am a far cry from the competent philosophical gardner!

... still you have to start somewhere! ...planting is going full tilt...


I had thought seeds and seedlings might have some revelation for me in terms of creativity...maybe I just need to be patient, but what it did prompt me to do was revisit paper-making.


Making seed cards

I started off with egg boxes, tearing up the card into small pieces, I hoped a few days soaking would be enough to break down the card but I did have to put the pulp through a blender to break it down.


I experimented with ways of moulding the pulp to make seed papers. Baking trays and cookie cutters turned out to be useful moulds, I used a spent tea bag to fill the hole in the orange cutter but allow water to drain away. 

After a day of initial drying I pressed in poppy seeds, the idea being you can give the seed cards away, the card can be planted and will disintegrate in the ground. At the end of this post are two extra links to more details on this idea.


Making paper sheets

It is quite a long time since I have done paper making so I am a little rusty, but once you start it is quite addictive. You need more water than you expect and the finer the pulp is, the neater the sheets will be. To form a series of sheets the same size use a 'deckle'. You can buy or make these, a frame with mesh stretched tightly over it. There are a few different versions f you start researching this, but this is my deckle.


Dipping and dragging the sheet former or 'deckle' through the water, you pick up an even layer of pulp, water drains through the mesh. I would need to do some more to work on better edges, so maybe I will add more pictures or do another post on this.


Getting the sheet to 'roll smoothly' off the former is tricky.


You could add other ingredients to the pulp, I might try some cut grass, dandelion seeds and other paper fragments. The finishing of the sheets would also vary if you pressed them or burnished them as they dried out. The surface will be very rough compared to manufactured paper but it might be nice to collage on top of or sew into.


Wildlife Trust Seed Bomb


Ourdoor Mom seed paper


The mypodshots site is a creation of Californa based photographer Mark Connelly


Wednesday, 13 May 2020

Shadows and Silhouettes

One of my favourite things to draw is shadows. I like to use a pipette and "Quink" ink or proceon dye, trace the shadow of leaves as they are cast onto a sketchbook page and then fill in the spaces with ink either as a solid silhouette, or in a way the describes the plant.

I get fascinated by the way the shadows move, you can play with scale and even bend the shadows over different surfaces.

My phone has a really powerful torch so I can just shine that through the leaves and try and hold it steady when there is a composition I like on the sketchbook page.


This particular composition was inspired by and artist called Paul Morrison, who plays with scale, and black and white organic imagery reminiscent of book illustrations but blown up to an architectural scale.


Shadows are a recurrent interest of mine, one aspect of which I would love to spend more time exploring is shadow puppets... just leaving this here, the 


Shadow Puppet of Bima


The history of humanity - as told through one hundred objects from the British Museum in London - is in South East Asia. This week Neil MacGregor, the museum's director, is with the objects from across the world around 400 years ago that explore the relationships between religion and society. Today he is with a shadow puppet from the Indonesian island of Java, asking how a puppet watched by a predominantly Muslim audience is a character from a Hindi epic.


Tuesday, 12 May 2020

Transfer Printing Tuesday

A low tech look at heat transfer printing, I have no 'correct dyes/pigments' available and not much in the way of specialist transfer papers, not even any coloured wax crayons...but it can still be fun working with a hot iron.

Heat transfer printing is a relatively new form of printing utilising a heat press in an ideal world, or an iron if you are working from home! As always I am approaching the idea with limited resources, woking from home, trying to translate some ideas inspired by my allotment into material outcomes to see what happens, all purely experimental.

This method is mainly used with sublimation dyes which I think have a really interesting history linked to the development of synthetic fabrics, but a whole range of media can be heat bonded to fabric or other sheet materials. I really recommend the book listed at the end of this post if you like working with mixed media.

Today I am working at my desk, with some flowers off the plot and some drawings of flowers I have sone in the past. I hope to translate these black and white line drawings into something more textural and interesting.


posca pen, wax crayon and chinagraph pencil.


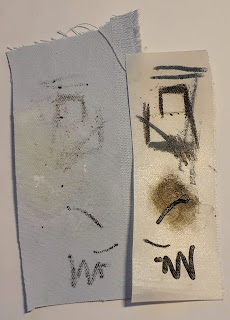
I first tested some drawing mediums on freezer paper, (link provides for more information), but the marks only faintly transferred after ironing. You can buy photo transfer papers online which enable you to put anything you can digitally print onto fabric but here I am working more low tech...what I did have to hand was some  "Bonderweb"

Below are some tests to see what works well. You can draw onto the backing paper which is much more stable or you can gently draw/use a pipette onto the glue mesh. Once ironed the drawing is effectively glued to the fabric or paper.


Translucent enough to easily trace images

Here I used crayon on the backing paper and block print ink on the mesh Let this dry!

Chinagraph pencil just on the backing paper.

PROTECT YOUR IRON!
You are effectively ironing a thin layer of glue, in college we use older irons for this type of work


You can trap paper fragments and threads with the bonderweb

Ironed onto card, I also used a spoon to burnish this image to get it to transfer.


If any of this is interesting I recommend this book and the work of the author Dawn Dupree. Like many other print processes the interesting stuff happens when different materials and processes interact and there are many facets to this technique.